
# Spring
# 1.概述
1.spring是一个轻量级的开源框架
2.降低企业应用开发复杂性
3.核心部分AOP和IOC
IOC:控制反转,将创建对象交给spring管理
AOP:面向切面,不修改源代码进行功能增强
4.特点
1)方便解耦,简化开发
2)AOP编程支持
3)方便测试(Unit)
4)方便整合其他框架(mybatis等)
5)方便事务操作
6)降低api开发难度
# 2.IOC
# 1.什么是IOC
1)控制反转,把对象创建和对象之间的调用过程,交给Spring进行管理
2)ioc目的:降低耦合
3)入门案例就是IOC实现
# 2.IOC底层原理
1)xml解析、工厂模式、反射
# 3.IOC过程:
1)xml配置文件,配置创建的对象
<bean id="user" class="com.demo.spring.User"> </bean>
2)有service层有dao层,创建工厂类
class UserFactory{
    public static UserDao getDao(){
        String classValue=class属性值;//xml解析得到类的全例名
        Class class=Class.forName(classValue);//通过反射创建对象
        return (UserDao)clazz.newInstance();
    }
}
2
3
4
5
6
7
# 4.IOC接口
1)IOC容器实质就是对象工厂
2)spring提供ioc容器的两种实现方式:
BeanFactory:IOC基本实现,spring内部使用的接口(使用时才创建对象,懒加载)
ApplicationContext:BeanFactory的子接口,提供更强大的功能,开发使用,加载时创建
3)两个主要实现类

FileSystem参数为文件系统路径
ClassPath参数为类路径
# 5.IOC的Bean管理
1.什么是bean管理
1)spring创建对象
<bean id="user" class="com.demo.spring.User"> </bean>
创建默认执行无参构造方法
2)spring注入属性
DI依赖注入:set方法注入,有参数的构造注入
set:先写set函数,再xml配置
<bean id="user" class="com.demo.spring.User">
            <property name="name" value="张三"/>
            <property name="age" value="19"/>
      </bean>
2
3
4
有参函数:先写构造器,再xml配置
public class Orders {
    private String oname;
    private String address;

    public Orders(String oname, String address) {
        this.oname = oname;
        this.address = address;
    }
    public void show(){
        System.out.println(oname+"::"+address);
    }
}
2
3
4
5
6
7
8
9
10
11
12
<bean id="orders" class="com.demo.spring.Orders">
            <constructor-arg index="0" value="电脑"/>
            <constructor-arg index="1" value="西湖"/>
</bean>
2
3
4
2.bean管理的实现方式
1)xml配置
2)注解实现
# 6.xml其他属性注入
1.字面量
字面量就是「直接写在代码里的固定值」
<bean id="book" class="com.demo.spring.Book">
            <!--存放空值            -->
            <property name="author">
                  <null/>
            </property>
            <!--存放特殊符号,或者可以使用转义字符-->
            <property name="bname">
                  <value><![CDATA[
                  <<南经>>
                  ]]></value>
            </property>
      </bean>
2
3
4
5
6
7
8
9
10
11
12
2.外部注入
1)创建UserDao接口和UserDaoImpl实现类,定义update方法
2)创建UserServiceImpl和UserDao属性和set方法,定义add方法
public class UserService {
    private UserDao userDao;
    public void setUserDao(UserDao userDao) {
        this.userDao = userDao;
    }
    public void add(){
        System.out.println("service add...");
        userDao.update();
    }
}
2
3
4
5
6
7
8
9
10
3)配置xml文件实现外部注入
<bean id="UserService" class="com.demo.spring.service.UserService">
            <property name="userDao" ref="UserDaoImpl"></property>
      </bean>

      <bean id="UserDaoImpl" class="com.demo.spring.dao.impl.UserDaoImpl">
      </bean>
2
3
4
5
6
3.内部bean
1)创建部门和员工类,一对多关系
2)将部门作为员工的属性
3)配置xml实现内部注入
<bean id="Emp" class="com.demo.spring.Emp">
            <property name="ename" value="lili"></property>
            <property name="gender" value="女"></property>
            <property name="dept">
                  <bean id="Dept" class="com.demo.spring.Dept">
                        <property name="dname" value="技术部"></property>
                   </bean>
            </property>
      </bean>
2
3
4
5
6
7
8
9
4.级联赋值
还是以上例为例
写法一:
<bean id="Emp" class="com.demo.spring.Emp">
            <property name="ename" value="lili"></property>
            <property name="gender" value="女"></property>
            <property name="dept" ref="Dept"></property>
      </bean>
      <bean id="Dept" class="com.demo.spring.Dept">
            <property name="dname" value="技术部"></property>
      </bean>
2
3
4
5
6
7
8
写法二:
<bean id="Emp" class="com.demo.spring.Emp">
            <property name="ename" value="lili"></property>
            <property name="gender" value="女"></property>
            <property name="dept" ref="Dept"></property>
            <property name="dept.dname" value="生活部"></property>
      </bean>
      <bean id="Dept" class="com.demo.spring.Dept">
            <property name="dname" value="技术部"></property>
      </bean>
2
3
4
5
6
7
8
9
# 7.集合属性注入
1)创建集合类
public class Stu {
    private String[] courses;
    private List<String> list;
    private Map<String,String> map;
    private Set<String> set;

    public void setCourses(String[] courses) {
        this.courses = courses;
    }

    public void setMap(Map<String, String> map) {
        this.map = map;
    }

    public void setList(List<String> list) {
        this.list = list;
    }

    public void setSet(Set<String> set) {
        this.set = set;
    }
    public void show(){
        System.out.println(courses);
        System.out.println(list);
        System.out.println(map);
        System.out.println(set);
    }

}
2
3
4
5
6
7
8
9
10
11
12
13
14
15
16
17
18
19
20
21
22
23
24
25
26
27
28
29
xml配置
<?xml version="1.0" encoding="UTF-8" ?>
<beans xmlns="http://www.springframework.org/schema/beans"
       xmlns:xsi="http://www.w3.org/2001/XMLSchema-instance"
       xsi:schemaLocation="http://www.springframework.org/schema/beans http://www.springframework.org/schema/beans/spring-beans.xsd">
      <bean id="Stu" class="com.demo.spring.CollectionSet.Stu">
            <property name="courses">
                  <array>
                        <value>java</value>
                        <value>c++</value>
                  </array>
            </property>
            <property name="list">
                  <list>
                        <value>list-java</value>
                        <value>list-c++</value>
                  </list>
            </property>
            <property name="map">
                  <map>
                        <entry key="map1" value="java"></entry>
                        <entry key="map2" value="c++"></entry>
                  </map>
            </property>
            <property name="set">
                  <set>
                        <value>set-java</value>
                        <value>set-c++</value>
                  </set>
            </property>

      </bean>

</beans>
2
3
4
5
6
7
8
9
10
11
12
13
14
15
16
17
18
19
20
21
22
23
24
25
26
27
28
29
30
31
32
33
2)注入集合对象
<?xml version="1.0" encoding="UTF-8" ?>
<beans xmlns="http://www.springframework.org/schema/beans"
       xmlns:xsi="http://www.w3.org/2001/XMLSchema-instance"
       xsi:schemaLocation="http://www.springframework.org/schema/beans http://www.springframework.org/schema/beans/spring-beans.xsd">
      <bean id="Stu" class="com.demo.spring.CollectionSet.Stu">
            <property name="courses">
                  <array>
                        <value>java</value>
                        <value>c++</value>
                  </array>
            </property>
            <property name="list">
                  <list>
                        <value>list-java</value>
                        <value>list-c++</value>
                  </list>
            </property>
            <property name="map">
                  <map>
                        <entry key="map1" value="java"></entry>
                        <entry key="map2" value="c++"></entry>
                  </map>
            </property>
            <property name="set">
                  <set>
                        <value>set-java</value>
                        <value>set-c++</value>
                  </set>
            </property>
            <property name="courseList">
                  <list>
                        <ref bean="course1"></ref>
                        <ref bean="course2"></ref>
                  </list>
            </property>
      </bean>
      <bean id="course1" class="com.demo.spring.CollectionSet.course">
            <property name="cname" value="SSM框架"></property>
      </bean>
      <bean id="course2" class="com.demo.spring.CollectionSet.course">
            <property name="cname" value="SpringBoot"></property>
      </bean>
</beans>
2
3
4
5
6
7
8
9
10
11
12
13
14
15
16
17
18
19
20
21
22
23
24
25
26
27
28
29
30
31
32
33
34
35
36
37
38
39
40
41
42
43
3)公共部分提取
引入命名空间util
<?xml version="1.0" encoding="UTF-8" ?>
<beans xmlns="http://www.springframework.org/schema/beans"
       xmlns:xsi="http://www.w3.org/2001/XMLSchema-instance"
       xmlns:util="http://www.springframework.org/schema/util"
       xsi:schemaLocation="http://www.springframework.org/schema/beans
                           http://www.springframework.org/schema/beans/spring-beans.xsd
                           http://www.springframework.org/schema/util
                           http://www.springframework.org/schema/util/spring-util.xsd">
2
3
4
5
6
7
8
提取使用
<?xml version="1.0" encoding="UTF-8" ?>
<beans xmlns="http://www.springframework.org/schema/beans"
       xmlns:xsi="http://www.w3.org/2001/XMLSchema-instance"
       xmlns:util="http://www.springframework.org/schema/util"
       xsi:schemaLocation="http://www.springframework.org/schema/beans
                           http://www.springframework.org/schema/beans/spring-beans.xsd
                           http://www.springframework.org/schema/util
                           http://www.springframework.org/schema/util/spring-util.xsd">

      <util:list id="list">
            <value>list-java</value>
            <value>list-c++</value>
            <value>list-python</value>
      </util:list>

      <bean id="TextBook" class="com.demo.spring.CollectionSet.TextBook">
            <property name="bookList" ref="list"></property>
      </bean>
</beans>
2
3
4
5
6
7
8
9
10
11
12
13
14
15
16
17
18
19
# 8.IOC中的工厂Bean管理
bean包括普通bean和工厂bean(FactoryBean)
普通bean:在配置文件中的定义类型与返回值类型一样
工厂bean:在配置文件中定义的类型与返回值类型不一样
实现:
创建类,让这个类实现工厂bean
实现接口里的方法,定义返回值类型
public class MyBean implements FactoryBean<Book> {

    @Override
    public Book getObject() throws Exception {
        Book book = new Book();
        book.setBname("Spring");
        book.setAuthor("Duke");
        return book;
    }

    @Override
    public Class<?> getObjectType() {
        return null;
    }

    @Override
    public boolean isSingleton() {
        return FactoryBean.super.isSingleton();
    }
}
2
3
4
5
6
7
8
9
10
11
12
13
14
15
16
17
18
19
20
bean的作用域
<bean id="myBean" class="com.demo.spring.FactoryBean.MyBean" scope="singleton"></bean>
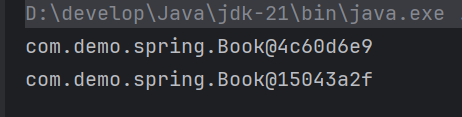
bean中有scope属性用于设置单实例和多实例
singleton:单实例,加载时创建对象
prototype:多实例,执行getBean方法创建对象
@Test
    public void test_eight(){
        ApplicationContext  context =new ClassPathXmlApplicationContext("bean7.xml");
        Book myBean = context.getBean("myBean", Book.class);
        Book myBean1 = context.getBean("myBean", Book.class);
        System.out.println(myBean);
        System.out.println(myBean1);
    }
2
3
4
5
6
7
8
# 9.Bean的生命周期(包括前后置方法)
1)调用无参构造器创建bean实例
2)调用set方法为属性赋值
3)前置方法
4)初始化方法
5)后置方法
6)bean的实例使用
7)bean的销毁
演示
subject类
public class Subject {
    private String name;

    public Subject(){
        System.out.println("第一步创建Bean实例");
    }
    public void setName(String name){
        System.out.println("第二步为属性赋值");
        this.name = name;
    }

    public void init(){
        System.out.println("第三步初始化方法");
    }

    public void destroy(){
        System.out.println("第五步销毁方法");
    }
}
2
3
4
5
6
7
8
9
10
11
12
13
14
15
16
17
18
19
beanPost类
public class BeanPost implements BeanPostProcessor {
    @Override
    public Object postProcessAfterInitialization(Object bean, String beanName) throws BeansException {
        System.out.println("后置方法");
        return BeanPostProcessor.super.postProcessAfterInitialization(bean, beanName);
    }

    @Override
    public Object postProcessBeforeInitialization(Object bean, String beanName) throws BeansException {
        System.out.println("前置方法");
        return BeanPostProcessor.super.postProcessBeforeInitialization(bean, beanName);
    }
}
2
3
4
5
6
7
8
9
10
11
12
13
配置文件
<?xml version="1.0" encoding="UTF-8" ?>
<beans xmlns="http://www.springframework.org/schema/beans"
       xmlns:xsi="http://www.w3.org/2001/XMLSchema-instance"
       xsi:schemaLocation="http://www.springframework.org/schema/beans http://www.springframework.org/schema/beans/spring-beans.xsd">
    <bean id="subject" class="com.demo.spring.Initial.Subject" init-method="init" destroy-method="destroy">

    </bean>
      <bean id="beanPost" class="com.demo.spring.Initial.BeanPost">

      </bean>
</beans>
2
3
4
5
6
7
8
9
10
11
测试
    @Test
    public void test_nine(){
        ClassPathXmlApplicationContext context =new ClassPathXmlApplicationContext("bean8.xml");
        Subject myBean = context.getBean("subject", Subject.class);
        System.out.println("第四步bean使用");
        //手动销毁
        context.close();
    }
2
3
4
5
6
7
8
# 10.xml自动装配
1.什么是自动装配
根据指定装配原则(指定名称或指定类型),根据匹配的值spring自动注入属性值
2.实现
根据名称装配
<bean id="student" class="com.demo.spring.Autowired.Student" autowire="byName">
      </bean>

      <bean id="teacher" class="com.demo.spring.Autowired.Teacher">
      </bean>
2
3
4
5
根据类型装配,只能有一个teacher bean多了会报错
   <bean id="student" class="com.demo.spring.Autowired.Student" autowire="byType">
      </bean>

      <bean id="teacher" class="com.demo.spring.Autowired.Teacher">
      </bean>
2
3
4
5
# 11.引入外部属性文件
<?xml version="1.0" encoding="UTF-8" ?>
<beans xmlns="http://www.springframework.org/schema/beans"
       xmlns:xsi="http://www.w3.org/2001/XMLSchema-instance"
       xmlns:context="http://www.springframework.org/schema/context"
       xsi:schemaLocation="http://www.springframework.org/schema/beans http://www.springframework.org/schema/beans/spring-beans.xsd
                        http://www.springframework.org/schema/context  http://www.springframework.org/schema/context/spring-context.xsd
">
      <context:property-placeholder location="classpath:jdbc.properties"/>

      <bean id="dataSource" class="com.alibaba.druid.pool.DruidDataSource">
            <property name="driverClassName" value="${prop.diverClass}"></property>
            <property name="url" value="${prop.url}"></property>
            <property name="username" value="${prop.username}"></property>
            <property name="password" value="${prop.password}"></property>
      </bean>
</beans>
2
3
4
5
6
7
8
9
10
11
12
13
14
15
16
外部文件
prop.diverClass=com.mysql.jdbc.Driver
prop.url=jdbc:mysql://localhost:3306/test?useUnicode=true&characterEncoding=utf8
prop.username=root
prop.password=1234
2
3
4
# 12.基于注解实现Bean管理
1.注解:代码的特殊标记,@注解名称(属性值)
spring针对bean管理中创建对象提供的注解
@Component,@Service,@Controller,@Repository
2.实现
1)配置xml
<?xml version="1.0" encoding="UTF-8" ?>
<beans xmlns="http://www.springframework.org/schema/beans"
       xmlns:xsi="http://www.w3.org/2001/XMLSchema-instance"
       xmlns:context="http://www.springframework.org/schema/context"
       xsi:schemaLocation="http://www.springframework.org/schema/beans http://www.springframework.org/schema/beans/spring-beans.xsd
                        http://www.springframework.org/schema/context  http://www.springframework.org/schema/context/spring-context.xsd
">
      <context:component-scan base-package="com.demo.spring">

      </context:component-scan>
</beans>
2
3
4
5
6
7
8
9
10
11
2)在userService上加上注解
@Component
public class UserService {
    public void add(){
        System.out.println("service add...");
    }
}
2
3
4
5
6
3)测试
3.标签选项
use-default-filters不使用默认过滤器,需要自己定义
context:include-filte 只扫描符合规则的
context:exclude-filte 排除符合规则的
<context:component-scan base-package="com.demo.spring" use-default-filters="false">
            <context:include-filter type="annotation" expression="org.springframework.stereotype.Controller"/>
      </context:component-scan>

      <context:component-scan base-package="com.demo.spring" use-default-filters="false">
            <context:exclude-filter type="annotation" expression="org.springframework.stereotype.Controller"/>
      </context:component-scan>
2
3
4
5
6
7
# 13.基于注解实现属性注入
@Autowired:自动按类型注入依赖对象
@Qualifier(配合@Autowired使用):当容器中有多个同类型 Bean 时,通过名称指定要注入的 Bean,解决 @Autowired 按类型匹配的冲突问题。
@Resource:按名称注入依赖对象(默认),也可指定按类型注入,是 @Autowired + @Qualifier 的替代方案。
未指定name属性:
先按字段/方法名查找Bean(
userService)如果找不到,再按类型(
UserService.class)查找如果按类型找到多个,则抛出异常
@Value:注入简单属性值
示例
1.创建userDao接口和实现类,并用注解注册bean
@Repository//(value=UserDaoImpl1)
public class UserDaoImpl implements UserDao{
    @Override
    public void update() {
        System.out.println("dao update...");
    }
}
2
3
4
5
6
7
2.在UserService里注入属性并调用方法
@Service
public class UserService {
    @Autowired
    //@Qualifier("UserDaoImpl1")
    private UserDao userDao;

    public void add(){
        System.out.println("service add...");
        userDao.update();
    }
}
2
3
4
5
6
7
8
9
10
11
3.测试
# 14.完全注解开发
编写配置文件
@Configuration
@ComponentScan("com.demo.spring")
public class SpringConfig {

}
2
3
4
5
修改测试类中读取的文件
    @Test
    public void test_one(){
        ApplicationContext  context =new AnnotationConfigApplicationContext(SpringConfig.class);
        UserService userService = context.getBean("userService", UserService.class);
        userService.add();
    }
2
3
4
5
6
# 补充:spring的隐式自动装配
Spring 容器会自动管理@Bean注解生成的 Bean,且在@Bean方法参数中自动匹配同类型 Bean 完成注入,无需手动@Autowired注解(这是 Spring 的 “隐式自动装配”)。
案例
    //配置生成模板解析器
    @Bean
    public ITemplateResolver templateResolver() {
        WebApplicationContext webApplicationContext = ContextLoader.getCurrentWebApplicationContext();
        // ServletContextTemplateResolver需要一个ServletContext作为构造参数,可通过WebApplicationContext 的方法获得
        ServletContextTemplateResolver templateResolver = new ServletContextTemplateResolver(
                webApplicationContext.getServletContext());
        templateResolver.setPrefix("/WEB-INF/templates/");
        templateResolver.setSuffix(".html");
        templateResolver.setCharacterEncoding("UTF-8");
        templateResolver.setTemplateMode(TemplateMode.HTML);
        return templateResolver;
    }

    //生成模板引擎并为模板引擎注入模板解析器
    @Bean
    public SpringTemplateEngine templateEngine(ITemplateResolver templateResolver) {
        SpringTemplateEngine templateEngine = new SpringTemplateEngine();
        templateEngine.setTemplateResolver(templateResolver);
        return templateEngine;
    }
2
3
4
5
6
7
8
9
10
11
12
13
14
15
16
17
18
19
20
21