
# Spring事务
# 1.事务概念
1、什么事务
(1)事务是数据库操作最基本单元,逻辑上一组操作,要么都成功,如果有一个失败所有操作都失败。
(2)典型场景:银行转账
- mary转账 100 元给 lucy
- mary少 100,lucy多 100
2.事务四个特性(ACID)
(1)原子性(Atomicity)
(2)一致性(Consistency)
(3)隔离性(Isolation)
(4)持久性(Durability)
# 2.银行示例
数据库
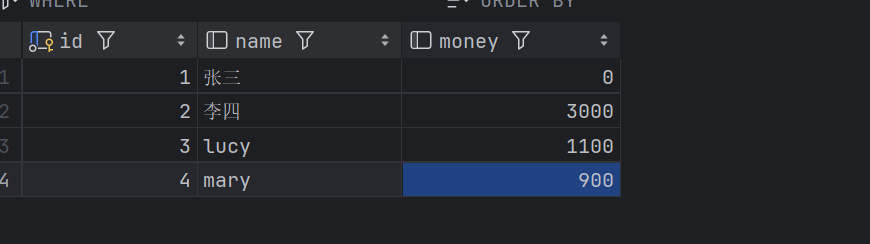
1.配置文件
<?xml version="1.0" encoding="UTF-8" ?>
<beans xmlns="http://www.springframework.org/schema/beans"
       xmlns:xsi="http://www.w3.org/2001/XMLSchema-instance"
       xmlns:context="http://www.springframework.org/schema/context"
       xsi:schemaLocation="http://www.springframework.org/schema/beans http://www.springframework.org/schema/beans/spring-beans.xsd
                        http://www.springframework.org/schema/context  http://www.springframework.org/schema/context/spring-context.xsd
">
    <context:component-scan base-package="com.demo.spring"></context:component-scan>
    <context:property-placeholder location="classpath:jdbc.properties"/>

    <bean id="dataSource" class="com.alibaba.druid.pool.DruidDataSource">
        <property name="driverClassName" value="${prop.diverClass}"></property>
        <property name="url" value="${prop.url}"></property>
        <property name="username" value="${prop.username}"></property>
        <property name="password" value="${prop.password}"></property>
    </bean>

    <bean id="jdbcTemplate" class="org.springframework.jdbc.core.JdbcTemplate">
        <property name="dataSource" ref="dataSource"></property>
    </bean>
</beans>
1
2
3
4
5
6
7
8
9
10
11
12
13
14
15
16
17
18
19
20
21
2
3
4
5
6
7
8
9
10
11
12
13
14
15
16
17
18
19
20
21
prop.diverClass=com.mysql.jdbc.Driver
prop.url=jdbc:mysql://localhost:3306/test?useUnicode=true&characterEncoding=utf8
prop.username=root
prop.password=1234
1
2
3
4
2
3
4
2.dao层
public interface UserDao {
    //多钱方法
    void addMoney();
    //少钱方法
    void reduceMoney();
}

@Repository
public class UserDaoImpl implements UserDao{
   @Autowired
   private JdbcTemplate jdbcTemplate;

   // 添加钱
    @Override
    public void addMoney() {
        String sql="update account set money=money+? where name=?";
        jdbcTemplate.update(sql,100,"lucy");
    }
    // 减钱
    @Override
    public void reduceMoney() {
        String sql="update account set money=money-? where name=?";
        jdbcTemplate.update(sql,100,"mary");

    }

}
1
2
3
4
5
6
7
8
9
10
11
12
13
14
15
16
17
18
19
20
21
22
23
24
25
26
27
2
3
4
5
6
7
8
9
10
11
12
13
14
15
16
17
18
19
20
21
22
23
24
25
26
27
3.service层
@Service
public class UserService {
    @Autowired
    private UserDao userDao;


    //转账方法
    public void transfer(){
        //mary减100
        userDao.reduceMoney();
        //lucy加100
        userDao.addMoney();
    }
}
1
2
3
4
5
6
7
8
9
10
11
12
13
14
2
3
4
5
6
7
8
9
10
11
12
13
14
4.测试
@Test
    public void test1(){
        ClassPathXmlApplicationContext context = new ClassPathXmlApplicationContext("bean1.xml");
        UserService userService = context.getBean("userService", UserService.class);
        userService.transfer();
    }
1
2
3
4
5
6
2
3
4
5
6
但是上述代码可能存在问题比如当下面的方法发生异常时,只会执行mary-100,而不会实现lucy+100,这就出现了数据一致性的问题。
public void transfer(){
        //mary减100
        userDao.reduceMoney();

        //模拟异常
        int i=10/0;

        //lucy加100
        userDao.addMoney();
    }
1
2
3
4
5
6
7
8
9
10
2
3
4
5
6
7
8
9
10
所以需要事务来进行约束,下面是执行事务的流程(编程式事务)
public void transfer(){
        try {
            //1.开启事务

            //2.执行操作
            //mary减100
            userDao.reduceMoney();

            //模拟异常
            int i=10/0;

            //lucy加100
            userDao.addMoney();
            //3.提交事务
        }catch (Exception e){
            //4.回滚事务
            e.printStackTrace();
        }

    }
1
2
3
4
5
6
7
8
9
10
11
12
13
14
15
16
17
18
19
20
2
3
4
5
6
7
8
9
10
11
12
13
14
15
16
17
18
19
20
# 3.Spring事务管理介绍
1.事务添加到Service层
2.Spring事务管理有编程式和声明式(使用)两种方式
3.声明式事务管理:
1)基于注解方式(使用)
2)xml配置方式
4.在Spring进行声明式事务管理,底层使用AOP原理
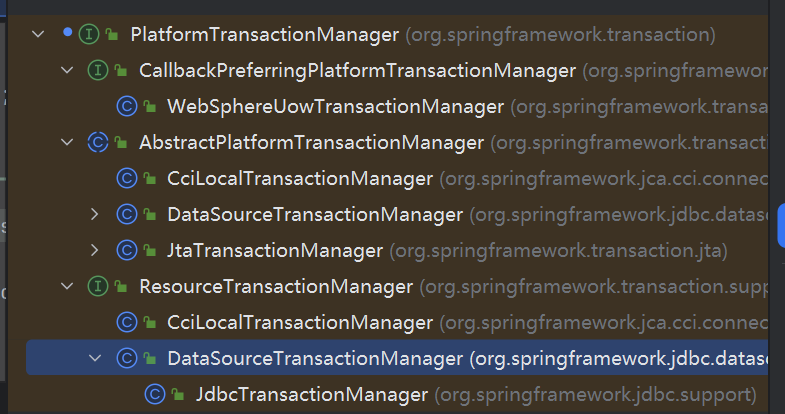
5.Spring事务管理API
提供一个接口,代表事务管理器,这个接口针对不同的框架提供不同的实现类
# 4.注解方式实现
1.配置事务管理器
<!--事务管理器-->
    <bean id="dataSourceTransactionManager" class="org.springframework.jdbc.datasource.DataSourceTransactionManager">
        <property name="dataSource" ref="dataSource"></property>
    </bean>
1
2
3
4
2
3
4
2.引入名称空间开启事务注解
<?xml version="1.0" encoding="UTF-8" ?>
<beans xmlns="http://www.springframework.org/schema/beans"
       xmlns:xsi="http://www.w3.org/2001/XMLSchema-instance"
       xmlns:context="http://www.springframework.org/schema/context"
       xmlns:tx="http://www.springframework.org/schema/tx"
       xsi:schemaLocation="http://www.springframework.org/schema/beans http://www.springframework.org/schema/beans/spring-beans.xsd
                        http://www.springframework.org/schema/context  http://www.springframework.org/schema/context/spring-context.xsd
                        http://www.springframework.org/schema/tx  http://www.springframework.org/schema/tx/spring-tx.xsd
">
1
2
3
4
5
6
7
8
9
2
3
4
5
6
7
8
9
<tx:annotation-driven transaction-manager="dataSourceTransactionManager"></tx:annotation-driven>
1
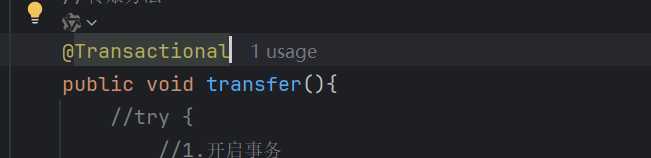
3.使用注解(可以加在类或方法上)
# 5.事务的参数
1.Propagation:事务的传播行为
| 传播行为常量 | 中文含义 | 核心逻辑 |
|---|---|---|
REQUIRED(默认) | 支持当前事务,无则新建 | 1. 若外层有事务,内层复用外层事务;2. 若外层无事务,内层新建事务。 |
REQUIRES_NEW | 新建事务,挂起当前事务 | 1. 无论外层是否有事务,内层都新建独立事务;2. 外层事务和内层事务互不影响。 |
NESTED | 嵌套事务 | 1. 内层事务是外层事务的 “子事务”; 2. 外层回滚则内层必回滚,内层回滚不影响外层。 |
SUPPORTS | 支持当前事务,无则无事务 | 1. 外层有事务则复用; 2. 外层无事务则以非事务方式执行。 |
NOT_SUPPORTED | 不支持事务,挂起当前事务 | 1. 无论外层是否有事务,内层都以非事务方式执行; 2. 外层事务会被挂起,执行完恢复。 |
MANDATORY | 必须有当前事务,否则报错 | 1. 外层必须有事务,否则抛 IllegalTransactionStateException;2. 强制依赖外层事务。 |
NEVER | 必须无当前事务,否则报错 | 1. 外层不能有事务,否则抛 IllegalTransactionStateException;2. 强制非事务执行。 |
2.isolation:事务隔离级别
和数据库一致
设置隔离级别
@Transactional(isolation = Isolation.REPEATABLE_READ)
1
- timeout:超时时间(默认-1不超时)
4.readOnly:是否只读
(1)读:查询操作,写:添加、修改、删除操作
(2)readOnly 默认值为 false,表示可以执行查询,也可以执行添加、修改、删除操作
(3)设置 readOnly 值为 true 后,该事务内只能执行查询操作
5.rollbackFor:回滚
设置出现哪些异常进行回滚
6.noRollbackFor:不回gun
设置出现哪些异常不进行回滚
# 6.xml方式实现声明式事务
配置xml,去掉注解
<!--事务管理器-->
    <bean id="transactionManager" class="org.springframework.jdbc.datasource.DataSourceTransactionManager">
        <property name="dataSource" ref="dataSource"></property>
    </bean>
<!--配置通知-->
    <tx:advice id="txAdvice">
<!-- 配置事务参数-->
        <tx:attributes>
            <tx:method name="transfer" propagation="REQUIRED"/>
        </tx:attributes>
    </tx:advice>
<!--配置切入点和切面-->
    <aop:config>
        <aop:pointcut id="pt" expression="execution(* com.demo.spring.service.UserService.*(..))"/>
        <aop:advisor advice-ref="txAdvice" pointcut-ref="pt"/>
    </aop:config>
1
2
3
4
5
6
7
8
9
10
11
12
13
14
15
16
2
3
4
5
6
7
8
9
10
11
12
13
14
15
16
# 7.完全注解方式
@Configuration
@ComponentScan("com.demo.spring")
@EnableTransactionManagement
public class GlobalConfig {
    //数据库配置
    @Bean
    public DruidDataSource druidDataSource(){
        DruidDataSource dataSource = new DruidDataSource();
        dataSource.setDriverClassName("com.mysql.jdbc.Driver");
        dataSource.setUrl("jdbc:mysql://localhost:3306/test?useUnicode=true&characterEncoding=utf8");
        dataSource.setUsername("root");
        dataSource.setPassword("1234");
        return dataSource;
    }
    //jdbc模板
    @Bean
    public JdbcTemplate jdbcTemplate(DruidDataSource dataSource){
        return new JdbcTemplate(dataSource);
    }
    //事务管理器
    @Bean
    public TransactionManager transactionManager(DruidDataSource dataSource){
        return new DataSourceTransactionManager(dataSource);
    }
}
1
2
3
4
5
6
7
8
9
10
11
12
13
14
15
16
17
18
19
20
21
22
23
24
25
2
3
4
5
6
7
8
9
10
11
12
13
14
15
16
17
18
19
20
21
22
23
24
25