
# 2.SpringMVC-HelloWord
# 1.准备
1.配置maven
 <dependencies>
        <dependency>
            <groupId>org.springframework</groupId>
            <artifactId>spring-webmvc</artifactId>
            <version>5.3.39</version>
        </dependency>
<!--        日志-->
        <dependency>
            <groupId>ch.qos.logback</groupId>
            <artifactId>logback-classic</artifactId>
            <version>1.4.6</version>
        </dependency>
<!--        servlet-->
        <dependency>
            <groupId>javax.servlet</groupId>
            <artifactId>javax.servlet-api</artifactId>
            <version>4.0.1</version>
            <scope>provided</scope>
        </dependency>
<!--        spring和thymeleaf整合包-->
        <dependency>
            <groupId>org.thymeleaf</groupId>
            <artifactId>thymeleaf-spring5</artifactId>
            <version>3.0.12.RELEASE</version>
        </dependency>

    </dependencies>
1
2
3
4
5
6
7
8
9
10
11
12
13
14
15
16
17
18
19
20
21
22
23
24
25
26
27
2
3
4
5
6
7
8
9
10
11
12
13
14
15
16
17
18
19
20
21
22
23
24
25
26
27
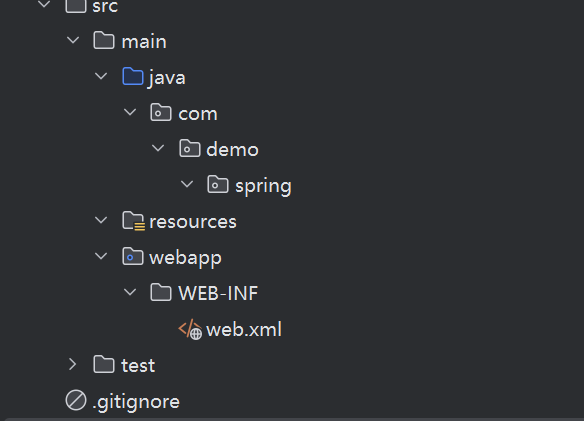
2.创建webapp和xml
xml在模块中创建,一定要是这个包
# 2.配置xml文件
webxml
<?xml version="1.0" encoding="UTF-8"?>
<web-app xmlns="http://xmlns.jcp.org/xml/ns/javaee"
         xmlns:xsi="http://www.w3.org/2001/XMLSchema-instance"
         xsi:schemaLocation="http://xmlns.jcp.org/xml/ns/javaee http://xmlns.jcp.org/xml/ns/javaee/web-app_4_0.xsd"
         version="4.0">
<!-- 配置springMVC前端控制器,对浏览器发送的请求进行统一处理-->
    <servlet>
        <servlet-name>SpringMVC</servlet-name>
        <servlet-class>org.springframework.web.servlet.DispatcherServlet</servlet-class>
<!--        配置springMVC配置文件的位置和名称-->
        <init-param>
            <param-name>contextConfigLocation</param-name>
            <param-value>classpath:springmvc.xml</param-value>
        </init-param>
<!--        提取初始化提高效率,默认第一次访问页面时进行初始化-->
        <load-on-startup>1</load-on-startup>
    </servlet>
    <servlet-mapping>
        <servlet-name>SpringMVC</servlet-name>
        <url-pattern>/</url-pattern>
    </servlet-mapping>
</web-app>
1
2
3
4
5
6
7
8
9
10
11
12
13
14
15
16
17
18
19
20
21
22
2
3
4
5
6
7
8
9
10
11
12
13
14
15
16
17
18
19
20
21
22
springmvc.xml
<?xml version="1.0" encoding="UTF-8" ?>
<beans xmlns="http://www.springframework.org/schema/beans"
       xmlns:xsi="http://www.w3.org/2001/XMLSchema-instance"
       xmlns:context="http://www.springframework.org/schema/context"
       xsi:schemaLocation="http://www.springframework.org/schema/beans http://www.springframework.org/schema/beans/spring-beans.xsd
                        http://www.springframework.org/schema/context  http://www.springframework.org/schema/context/spring-context.xsd
">
<!-- 配置Thymeleaf视图解析器 -->
<bean id="viewResolver" class="org.thymeleaf.spring5.view.ThymeleafViewResolver">
    <property name="order" value="1"/>
    <property name="characterEncoding" value="UTF-8"/>
    <property name="templateEngine">
        <bean class="org.thymeleaf.spring5.SpringTemplateEngine">
            <property name="templateResolver">
                <bean class="org.thymeleaf.spring5.templateresolver.SpringResourceTemplateResolver">
                    <!-- 视图前缀 -->
                    <property name="prefix" value="/WEB-INF/templates/"/>
                    <!-- 视图后缀 -->
                    <property name="suffix" value=".html"/>
                    <property name="templateMode" value="HTML5"/>
                    <property name="characterEncoding" value="UTF-8" />
                </bean>
            </property>
        </bean>
    </property>
</bean>
    <context:component-scan base-package="com.demo.spring"/>
</beans>
1
2
3
4
5
6
7
8
9
10
11
12
13
14
15
16
17
18
19
20
21
22
23
24
25
26
27
28
2
3
4
5
6
7
8
9
10
11
12
13
14
15
16
17
18
19
20
21
22
23
24
25
26
27
28
# 3.编写示例
1.编写html
xmlns:th="http://www.thymeleaf.org"让他被解析器识别
<!DOCTYPE html>
<html lang="en" xmlns:th="http://www.thymeleaf.org" >
<head>
    <meta charset="UTF-8">
    <title>首页</title>
</head>
<body>
<h1>首页</h1>
</body>
</html>
1
2
3
4
5
6
7
8
9
10
2
3
4
5
6
7
8
9
10
2.编写controller控制器
/+index加解析器的后缀匹配就得到了要跳转的页面
@Controller
public class HelloController {

    @RequestMapping("/")
    public String index() {
        return "index";
    }
}
1
2
3
4
5
6
7
8
2
3
4
5
6
7
8
# 4.跳转界面
1.在index添加(此处按绝对路径匹配,不用手动加项目名)
<a th:href="@{/target}">跳转到目标页面</a>
1
2.编写controller
@RequestMapping("/target")
    public String toTarget(){
        return "target";
    }
1
2
3
4
2
3
4
3.在/WEB-INF/templates目录下创建target.html
<!DOCTYPE html>
<html lang="en">
<head>
    <meta charset="UTF-8">
    <title>target</title>
</head>
<body>
Hello World
</body>
</html>
1
2
3
4
5
6
7
8
9
10
2
3
4
5
6
7
8
9
10
# 5.总结
1)浏览器发送请求
2)若请求地址符合前端控制器的路径匹配模式(url-pattern),那么请求被前端控制器DIspatcherServlet处理
3)前端控制器读取SpringMvc配置文件,通过组件扫描到控制器,将请求地址与@RequestMapping注解的value进行匹配,找到对应方法返回字符串路径
4)解析器根据返回值进行解析,拼接前后缀组成路径
5)Thymeleaf根据路径找到对应的html文件渲染视图
6)响应结果